In the Workshop: The Greenland Skin-on-frame Kayak, part two

(check out part one of the Greenland kayak build here)


It’s been a brutal summer  here in St. Louis.  With almost no rain, no humidity, and 100+ degree temperatures, the thought of getting into the water with a new kayak is more enticing than ever.  So, I’ve been in the workshop quite a bit.  The previous post showed the progress up to the completed deck of the kayak.  Here’s a look at the completion of the frame and cockpit.

Rib stock soaking (I used red oak)

The first task was to add the ribs.  While the literature made this step seem nerve-rackingly difficult, it actually came together without too much difficulty.

the jig for bending the ribs

Testing the fit after blocking the deck up

I took the time to put the deck on blocks, simulating the depth I’d have after adding ribs, and test the fit.  Snug, but comfortable.

Cutting ribs to length

Rib bending was a crash course in working with hardwood (everything up till now had been pine or douglas fir).  Everything came together in the end though.

The completed ribs

After the ribs cooled, it turned out that a few were a bit out of alignment with the rest.  I was so tempted to just ignore it, but I knew I’d regret it later.  So the next day I made a few replacements to get everything flush.

The running lashings for the keelson

Next came stem pieces to define the shape of the bow and stern, followed by the keelson and chines.  The keelson and chines were joined with a running lashing.  The lashings allow for slight flexibility in the joints, which then absorb the energy of waves, impacts, etc. This flexibility is one of the key components of traditional skin-on-frame kayak design, and makes for a very seaworthy craft.

The completed hull

With the hull complete, it started to really feel like there was an actual kayak in my garage.

Rotten hickory branch

The next challenge was the masik, the thigh-bracing deck beam that also serves as the rest for the cockpit coaming.  Since the masik is under greater stress than the other deck beams, it needs to be exceptionally strong.  A naturally curved hardwood branch is ideal.  Unfortunately, after chiseling away at what appeared to be a prime specimen of naturally curved hickory, it turned out to be rotted completely through.

The new masik was probably my favorite component of the frame.

While hacking away at what turned out to be a rotten branch was discouraging, I tried a new tactic. I epoxied two pieces of red oak lumber together, rough cut the shape with a jigsaw, then worked it down to size with a spokeshave and some sandpaper.  The finished product felt as sturdy as a baseball bat.

No post about woodworking is complete without at least one picture with a preposterous number of clamps.

After adding the deck ridges (which turned out to take much longer than expected), I decided to get creative by laminating a cockpit coaming.  I had no idea how messy this would be.  But, 7 layers of basswood and a full batch of epoxy later, I had a finished coaming, and finally…

The completed kayak frame

A completed frame. This brings us to the home stretch- all that’s left is the skinning process, deck lines and accessories, and a Greenland-style paddle. Check back soon for part three!

On the Water: My experience with the tandem kayak, aka the “divorce maker”

High tide on the coast of Mississippi

My wife and I just got back from a very pleasant week-long vacation on the coast of Mississippi.  While unfortunately better known for oil spills and hurricanes, the sun-drenched beaches of the Gulf Coast are actually very lush and full of wildlife.  The region has seen an increased interest in kayaking, and ample bays, beaches and bayous provide many opportunities to get on the water.  Having never kayaked in the area before, we couldn’t resist the urge to get in some paddling.  We made reservations with an outfitter for a reasonable 4 mile trip to one of Mississippi’s coastal islands.

The day of our paddle, we met our guide at the beach and slathered on sunscreen as we got the kayaks ready.  With calm winds and not a cloud in the sky, we could tell it was going to be a hot morning.   The Gulf Coast in July, as you can imagine, is generally unforgiving when it comes to sun and heat.  The calm waters and bleach-white sands ensure that once you’re hot, you stay hot.

We seemed to have an ideal morning of paddling ahead of us.  Our guide was knowledgeable, the water was glassy smooth, and our destination was easily visible from shore.  There was only one minor difficulty: My wife and I were paddling, for the first time, in a tandem kayak.

Single kayak vs tandem kayak

A tandem kayak is built for two paddlers instead of one.  It is usually moderately longer and significantly heavier than a solo kayak.  It requires a high level of cooperation between the two paddlers.  My wife and I both learned how to kayak in solo kayaks, and we never really had the opportunity to paddle a tandem until this particular trip.  We climbed in and, somewhat awkwardly, scooched ourselves off the beach.

A few hundred feet off shore, our kayak began to wander slowly but emphatically off course.  We tried to straighten out the kayak, only to have it wander off in the opposite direction, accompanied by increasing irritation and not a little swearing.  Our guide, who seemed infinitely patient and optimistic, came over to us after a mile or so and suggested we focus on synchronizing our paddling.  We eventually found enough rhythm to make it the remaining mile to our island destination.

Without a doubt, this was the peak of our paddling trip.  The pine-covered, uninhabited island was a wonderful contrast to the casino-covered beaches across the bay.  We even saw a dolphin skip past.  Encouraged by our moment of tranquility, we agreed with our guide that paddling to the other side of the island seemed like a good idea.

45 minutes later, both my wife and I were beginning to reach our limits.  The extra effort we put into course correction and trying not to hit each others’ paddles drained most of our energy.  The tandem kayak was far less responsive than a single kayak, and our movements became increasingly inefficient.  Unfortunately, we hit the point of exhaustion about two and a half miles away from the beach.  To make matters worse, the wind began to pick up and high tide was swiftly approaching.  The glassy water of a couple hours before became a choppy mess, and the wind continually pushed the bow of the kayak in the wrong direction.

I make a point, as most people do, of trying to maintain composure around people I’ve just met.  The last two miles of our paddle were anything but composed.  I felt awful for our guide, who was only a few yards away.  My wife and I shouted, cursed, fought over who was pushing the kayak off course, and nearly threw our paddles overboard in defeat.  It was finally clear how the tandem kayak had earned its nickname as “the divorce maker.”  Luckily for our marriage, we made it back to shore before things got completely out of hand.  In an exhausted haze, we landed the kayak and wandered zombie-like onto the beach, receiving some very puzzled looks from a group of nearby volleyball players.  Eventually, we helped pack up the kayaks and wish our guide farewell.  I silently hoped she hadn’t noticed our spousal strife, but I’m fairly certain it was hard to miss.  We hiked back to our car and called it a day.

In retrospect, it might have helped to spend a bit more time getting acquainted with the tandem kayak before a lengthy paddle.  There are plenty of benefits to a tandem kayak, and choosing a tandem or a solo kayak depends on what sort of paddling you plan to do.  That said, there are some unexpected challenges to the tandem.  Heeling to turn was nearly impossible, and the size of the kayak makes it less maneuverable.  Most important of all, heading out in a tandem kayak is a true commitment with your fellow paddler.  Be prepared to work together, and try to avoid conflict.  After all, in a tandem kayak, you are (quite literally) attached at the hip.

As for the Gulf Coast, do consider it for your next paddling trip.  There are so many intricate but accessible paddling destinations, both freshwater and coastal, and the locals are friendly and knowledgeable.  I can’t wait to go back myself (though perhaps in a solo kayak this time…)

Ocean News: A Tidal Wave of Debris

From ancient to modern times, humans and animals have traveled along the intricate network of ocean currents that encircle the globe.  Even plants have traveled these same currents, as in the case of drift seeds.  Besides transporting objects, these currents also play an integral part in weather patterns.  The gulf stream current, for example, carries warmth from the Gulf of Mexico across the Atlantic ocean, allowing Europe to have a much warmer climate than it would otherwise.

Ocean currents aren’t picky, and carry whatever lands in them.  One of the stranger payloads of ocean currents in modern times was in the news recently: the giant mass of debris from the 2011 Japanese Tsunami.

Tsunami Debris

 This tragic event in March of 2011 left thousands dead and literally washed away many communities on the Pacific coast of Japan.  While Japan has been recovering from the event for over a year now, a large portion of the tsunami debris is making its way across the currents of the Pacific Ocean.  A few objects have already landed in beaches from Alaska to Oregon.  Click here to see an article from the BBC with a detailed map of the debris.

While several smaller items have appeared up and down the West Coast (such as this motorcyle), one of the largest objects to wash ashore is a dock from Misawa, in northern Japan.  This dock showed up in Agate Beach, Oregon, earlier this month.  While the dock seems relatively benign (besides being gigantic), it presents a unique problem: invasive marine species.  A wide variety of algae, crustaceans, and other organisms native to Japan have hitched a ride on the dock.  These species would normally have no way of reaching the North American Pacific coast.  However, the Japanese dock is a perfect “ship” for voyaging across the ocean, and now that the species have arrived in Oregon, they could cause problems with local wildlife.

Invasive aquatic species can be a huge problem, both in marine and freshwater ecosystems. Here along the Mississippi river, we have a notorious invasive species: Asian Carp.

Grass Carp, one of the several invasive species of Asian Carp in the U.S.

The USDA has more info here about this unique species.  The fish were introduced from Asia to the U.S. in the 70’s, mostly for private ponds in various southern states.  For a variety of reasons, including the Great Mississippi and Missouri River flood of 1993, the fish escaped the private ponds and entered the river system.  Since that time, their numbers have multiplied exponentially.  The fish aren’t just a nuisance, but also an actual hazard, thanks to the fish’s jumping ability. Injuries from Asian Carp have ranged from black eyes and broken noses to concussions.

It may be unlikely that an invasive species as problematic as the Asian Carp will hitch a ride on the debris from the Japanese tsunami.  However, there’s no way to be sure of what species may be traveling across the Pacific, or what the effects may be when they arrive.  What is certain is that more debris is on its way…

In the Workshop: The Greenland Skin-on-frame Kayak

For how much I love the ocean, I had never really given sea kayaking much thought… until I read about the history of kayaking in Greenland.  It was amazing to learn about the sophistication of their craft, as well as their ability to navigate some of the world’s coldest and most turbulent oceans.  My fascination with Greenland’s kayaking heritage inspired me to take several classes in modern sea kayaking, and I quickly became hooked.  The next step was to purchase my own kayak.  I couldn’t afford a new one, and used ones were in short supply, so the “logical” solution was to build my own.  Many kayak building kits were just as far outside my budget as a new kayak, however.  One day I stumbled upon Christopher Cunningham’s book,  Building the Greenland Kayak, a step-by-step guide to building a skin-on-frame kayak.  The skin-on-frame kayak uses fewer supplies and requires less expensive tools than other building methods, and therefore just fit my budget.  My fascination with the Greenland kayak had come full circle as I decided to build my own.  In today’s post, I’ll present part one of my skin-on-frame kayak build.

Scarf joints clamped after applying marine epoxy

The Greenland kayak is typically around 16 feet long.  In my experience, this is quite a bit longer than it sounds.  Since I was unable to find (or transport) reasonable full-length lumber for the gunwhales (the “sides” of the kayak), I had to scarf six 6-foot boards together. Once scarfed and cleaned up a bit with a block plane, I transferred the measurements I’d taken for where my feet, knees, and back would fit.  Then I began to make rib mortises.

Drilling the holes for the rib mortises

I followed the book’s instructions for a “drill guide” jig, which quickly failed.  Luckily, this classic Stanley doweling jig worked wonders.  After drilling three holes in each of the 50 mortises, I cleaned out each one with a chisel to get an even rectangle.  Working by hand, this took ages.  After the rib mortises were done, I moved on to the deck beam mortises.

The deck beam mortises were particularly challenging

The deck beam mortises had to be drilled and cleaned up into an even rectangle, just like the rib mortises.  The challenge this time was that, because the gunwhales would be tilted a bit to the side, the mortises had to be drilled at an angle to accept the non-tilted deck beams.  The jig prescribed by the book for this job didn’t fail completely, but was nerve-wrackingly imprecise.  I made my own jig to simulate a deck beam tenon and insure the mortises were accurate as I filed them to size.

A short “key” to simulate a deck beam tenon insured an accurate mortise

With the gunwhales complete, I made the building forms to provide the kayak’s shape. It was quite reassuring to see the long planks I’d spent weeks chiseling and filing actually take the shape of a kayak.

The building forms hold the kayak in the proper shape

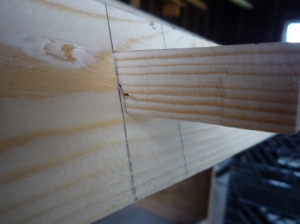
Next, I made the deck beams.  These required cutting 1×2 boards to length across the span of the kayak, then cutting a tenon to fit each mortise.  This required cutting a “compound bevel”, two different angles at the same time.  Unlike every other step up to this point, cutting the tenons was easier than expected and kind of relaxing.

The tenon fits snugly in the mortise, while the compound beveled shoulder makes contact with the gunwhale

Once all the deck beams were cut, I took off the building forms and assembled the gunwhales with the deck beams in place.

The deck beams fit in one at a time, kind of like a 17-foot long zipper

The end forms kept the thing from splitting back apart once assembled.  To lock the kayak in shape, each end got a lashing towards the bottom and a pair of trunnels– wedged dowels.

Adding the trunnels was one of my favorite parts

Like the ends, every other deck beam got lashings on each side to further hold the shape of the kayak.  After that, I secured each tenon with an 1/8th inch dowel, sawed everything flush, then sanded it smooth.

The completed deck

One of the truly remarkable things about the Greenland skin-on-frame kayak is how little it weighs. Picking up the completed deck, which contains the bulk of the finished weight, required no effort.  All in all, a satisfactory end to part one.

Look for part two of the Greenland skin-on-frame kayak build, in which I’ll be building the hull!


(check out part two of the kayak build here)

Boat Profile: The Greenland Skin-on-frame Kayak

All seafaring cultures face their own unique environmental challenges in boat building.  Construction methods, form, and function of watercraft vary depending on what resources are available.  The vast country of Greenland is no exception.  It stands as the world’s largest island, as well as the least densely populated country.  While almost all of the country is covered in ice, the thin strip of habitable coast encircling the island has been settled for millenia.  The people of Greenland faced frigid oceans, powerful storms, chunks of ice, and a rather unique feature of the landscape:  an almost complete lack of trees.  For all the unique challenges that boat builders were forced to overcome in other parts of the world, most had at least some lumber with which to build.  Not so for Greenland.  Almost all of their building material had to come from animal sources (such as seals) and driftwood (which, with thousands of miles of coastline, was in somewhat regular supply). Neither of these resources are particularly easy to use.  In spite of these challenges, however, Greenlanders developed a sophisticated sea craft that has inspired boat builders to this very day: the skin-on-frame kayak.

The Greenland Kayak

 Developed as a hunting craft, Greenland’s skin-on-frame kayak is light- a mere 40 pounds, roughly- swift, and sits low in the water to avoid detection by wildlife and to reduce windage (being blown over). It is based on a wooden (or bone) frame, lined with ribs that support the shape

The Greenland Kayak Frame

 of the hull.  These kayaks were tightly covered with waterproof seal hides.  The narrow beam of the kayak (only a few inches wider than the paddler’s hips) provides agility and response.  While less stable at first glance, this profile  provides stability and maneuverability in rough seas.  This particular shape also facilitates a unique aspect of Greenland seafaring: kayak rolling.  The original outfit for the Greenland kayaker is called a tuilik (the paddler in the picture above can be seen wearing a white-colored example).  This garment provides a watertight seal between the individual and the kayak.  One of the necessary skills for a Greenland kayaker was the ability to right the boat after capsizing, and to deliberatelycapsize and resurface, without leaving the kayak.  This skill was essential: in the frigid waters of Greenland, being in the water unprotected for even a short time can be fatal.

The narrow, agile kayak of Greenland was just one form of skin-on-frame building technology, which was spread all across the Arctic.  These traditional crafts inspired the development of modern kayak building in the rest of North America and Europe, though the traditional skin-on-frame or wood was mostly replaced by modern synthetics after the 70’s.  In recent years, however, there has been a powerful resurgence in traditional kayak building.  Modern builders have taken some liberties in developing a craft that is faithful to the form and function of the original skin-on-frame kayaks, but feasible in our modern world (canvas and nylon, for example, have replaced the original seal hide skin).   The sustainable use of materials, the light weight, and the competitive seaworthiness of this simple, elegant craft have inspired paddlers in many different countries.  As we face the challenges of diminishing resources in our modern world, the resource-famished history of Greenland has given us a technology to carry into the seafaring future.

Check back for my next post, in which I’ll introduce my own Greenland skin-on-frame kayak building project!

A Landlocked Introduction

Welcome to The Landlocked Seafarer!  My name is Beau, and I love the ocean- sailing, surfing, sea kayaking, maritime history, ocean conservation- the whole bit. 

Unfortunately, I live in St. Louis, Missouri, in the middle of the “American Heartland”.  The nearest beach is about 700 miles away.  Since childhood, I was dead certain I’d move to the coast one day, maybe spend my days surfing.  Alas, reality strikes all of us, and so for a variety of reasons I’m in St. Louis to stay.  But I haven’t let that stop me from learning to sail, learning to kayak, studying boat building and visiting the ocean as much as I can.

On The Landlocked Seafarer, you’ll find articles about the history of sailing and sea exploration, updates about my kayak and boat building projects, opportunities for hoisting the sails here in the Midwest, as well as other briny tidbits of ocean news and culture. 

So, whether you’re sitting in a marina in California or watching clouds roll by in a Nebraskan field, get your sea legs and join me for some landlocked seafaring!


Image